We've finally "bought the farm" so to speak. Well, bought a farm. Well, some land that will be a farm. :)
About 3 weeks ago we moved into our new house, on 5 acres, at the foothills of the Cascades. In a very small town of 1,400 people. Actually, we aren't even "in" the town, but a few miles outside of city limits.
The first few weeks have been busy, labor intensive, and exhausting. The remaining chickens, coop, and bees are moved. There is an old chicken coop on the property that needs some work. We plan on using our handmade coop for turkeys or other animals.
The property has 4 outbuildings, which I am discovering the joys of maintaining. 2 days after moving in, we have a large windstorm that knocked out power. Some people were out for days, luckily we were out just overnight. I cleared off the roofs of the garage, shed, woodshed. The chicken coop (with attached shed) didnt need it. But does need a new roof soon.
We've added 12 hens and a Rooster (my first!) to our flock. We'd like to get a pair of turkeys.
The front acre is cleared pasture with fruit trees and bushes. The back 4 acres are dense woods. We have a whole new set of problems here. Predators for one. I've seen 2 bear on the property already. And hear coyote packs in the neighboring woods at night. Neighbors have reported Mountain lion pretty regularly.
The new farm is called Woodlark Farm. The website is: www.facebook.com/woodlarkfarmWA. We have some pics up from the move, and around the property.
Tuesday, November 18, 2014

Friday, October 10, 2014
Busy as bees!
Last weekend we harvested 23lbs honey off of our hives. The initial hive is failing (high mite load and older queen). The split hive is looking strong going into winter.
We've recently culled our older laying hens, our first 4 birds. They were 3yo and not laying well. I can't justify feeding them all winter when they lay poorly. So were are down to 3 layers right now (Chicken Little, as well as the two White Leghorns).
Lastly, the biggest news of all. We purchased a house on 5 acres! We've been looking for a while, and finally found something. This will allow us to expand what animals we try keeping. Instead of being an urban farm, we will be a true hobby farm. We are both very excited, and somewhat scared. Maintaining a larger house in the wet PNW woods is somewhat of a scarey endeavor. The front half of the land is clear pasture (and gardens), the back is wooded.
We plan to take the winter to get settled in, fence in what we can of the property, and in the spring we'd like to start with a few weaner pigs in the back woods. Then at some point, once we feel ready, we'd like to try a few Katahdin sheep.
Wednesday, August 6, 2014
Summer Fun!
Well it certainly has been an eventful summer!
We processed the meat birds in two different batches. We weighted them all, and picked the 4 heaviest to do first. There was a large weight difference between the bigger and smaller birds, more than we were expecting. We also had to cull one bird due to illness. So we ended up harvesting 8 meat birds total.
Then, my good friend who I raised the meat birds with, encountered a good opportunity. A farmer about an hour away was getting rid of his certified organic laying flock of 14mo birds for a rock bottom price. We purchased 10, and advertised a slaughter class where we would teach people to kill, pluck, and process the birds. We had a full class! The only thing that went "awry", aside from a few escapee chickens, was the day of the class was incredibly hot (and my backyard provides little shade). We agreed no more slaughtering for a while. :)
We processed the meat birds in two different batches. We weighted them all, and picked the 4 heaviest to do first. There was a large weight difference between the bigger and smaller birds, more than we were expecting. We also had to cull one bird due to illness. So we ended up harvesting 8 meat birds total.
Then, my good friend who I raised the meat birds with, encountered a good opportunity. A farmer about an hour away was getting rid of his certified organic laying flock of 14mo birds for a rock bottom price. We purchased 10, and advertised a slaughter class where we would teach people to kill, pluck, and process the birds. We had a full class! The only thing that went "awry", aside from a few escapee chickens, was the day of the class was incredibly hot (and my backyard provides little shade). We agreed no more slaughtering for a while. :)
Monday, June 2, 2014
Meat chicks update
Our first endeavor into raising a meat animal is well underway!
The meat chicks arrived March 27th. We ordered 10, day old Red Rangers. Half are ours, half are a friends. We plan on keeping them at my friends in her heated garage til they are feathered out, then when they are ready for outside life, they are going into my old chicken tractor. I've been bothered by having it sit unused, so am glad to put it to use.
Here are a pics of the chicks when they were little.

They are currently growing quickly at my place. Here is a pic from within the last week or two.

So far, I am happy to report we only lost one chick! They are so happy to be outside. The boys are pretty obvious, and there are a few that are HUGE compared to the others. I'll post another update after harvesting!
The meat chicks arrived March 27th. We ordered 10, day old Red Rangers. Half are ours, half are a friends. We plan on keeping them at my friends in her heated garage til they are feathered out, then when they are ready for outside life, they are going into my old chicken tractor. I've been bothered by having it sit unused, so am glad to put it to use.
Here are a pics of the chicks when they were little.
They are currently growing quickly at my place. Here is a pic from within the last week or two.
So far, I am happy to report we only lost one chick! They are so happy to be outside. The boys are pretty obvious, and there are a few that are HUGE compared to the others. I'll post another update after harvesting!
Saturday, April 5, 2014
New compost structure
This morning we built a new compost structure. I use the term "building" loosley here, because it was more like "throw together some scraps". We had some old metal poles the previous owner left us under the shed. Last week we got several rolls of chicken wire for free. We drove 3 poles into the ground, and wrapped chicken wire around it, leaving it open in the front so I could add material and turn the pile as needed.
A few weeks ago I cleaned out the winter muck from the chicken coop (I use the deep litter method where it gets cleaned out 1-2x per year). However, I need to compost the chicken manure and it wouldn't all fit in my current compost bins.
My current composters are large galvanized trash cans, with holes drilled in them, submerged into the ground about 2/3 of the way. This allows worms in, but deters scavengers (racoons, mice, rats) who may be attracted to food items. So the "new" compost pile is for chicken manure and lawn clippings only - since it isn't scavenger proof.

You can see the new structure on the left, and the old "scavenger proof" one on the right. And of course the girls love digging around in the open pile, there was a good amount of red worms in it already - the manure had been sitting in a pile covered in a tarp for about a month.
A few weeks ago I cleaned out the winter muck from the chicken coop (I use the deep litter method where it gets cleaned out 1-2x per year). However, I need to compost the chicken manure and it wouldn't all fit in my current compost bins.
My current composters are large galvanized trash cans, with holes drilled in them, submerged into the ground about 2/3 of the way. This allows worms in, but deters scavengers (racoons, mice, rats) who may be attracted to food items. So the "new" compost pile is for chicken manure and lawn clippings only - since it isn't scavenger proof.
You can see the new structure on the left, and the old "scavenger proof" one on the right. And of course the girls love digging around in the open pile, there was a good amount of red worms in it already - the manure had been sitting in a pile covered in a tarp for about a month.
Thursday, March 13, 2014
Mountain of mulch...
Monday I got a free dump truck load of arborist mulch. About time! My chicken run was down to mud and dirt! I had been emailing local arborists for months. This is the second time I've gotten a load for free. Unfortunately, it came 2 days after I got garden soil delivered, and still hadn't cleared all of that out of the driveway. I think it was about 11 cubic yards of mulch. I used most of it in the chicken run and bee yard, a few neighbors took some as well.


The mountain of mulch
 |
| The chicken run before the mulch |
 |
| I had to jack up the coop onto blocks, so I could have the coop sit on the new layer of mulch |
 |
| All done! |
Thursday, January 30, 2014
Plans for spring
This spring and summer I will be trying something new. A friend and I ordered a batch of meat birds to raise/butcher together. It will be both of our first time raising meat birds. We ordered 10 chicks, and as usual expect to loose one or two. She has a good brooder set up, and I have our old chicken tractor sitting unused to put the birds in when they get older. We ordered "Red Rangers", aka "Freedom Rangers", and will be ready for butcher at about 9-11 weeks. The arrive late March/early April, so mid summer our freezers will be full. It's so nice to have a friend help you get through new adventures together!
It got me to thinking though, I hate my old chicken tractor sitting unused the majority of them time. It seems like there got to be an animal I can use it to house. So Im going to be researching how feasible it is to use it for some other type of bird.
Also for spring, I'd like to build a few more raised beds. I built one last week, and will be keeping my eye out at the hardware store for discounted lumber.
Saturday, December 7, 2013
Brrrr...
We've had a unusually long cold snap here - it's been below freezing every night for a week. I leaned plywood against the open air coop for some insulation, and finally got a heat lamp. After working a 9hr day, I went to the hardware store on the way home, and began setting it up in the dark. When I finially turned it on, I discovered a gruesome bloody mess in the coop.
The girls (mostly Henrietta I think), picked on little whitie while they were going up to roost- she was covered in blood - her entire head and neck. I brought her inside, wrapped her in a towel, and put her int he shower stall. I went back outside to finish setting up the heat lamp. When I came back in, I washed her off. It looked like she'd been pecked pretty badly around the comb. I dressed her wounds with neosporin, made up homemade electrolytes, and syringed them to her (she was in shock). She perked up after the electrolytes. I left her inside for the night. The next morning made her eat/drink some. She was acting much better overall, even making normal chicken noises. Later that afternoon, I gave her another bath, as she was still covered in blood, and I couldn't put her in w/the others so bloody. Here are her injuries after the 2nd bath.
.JPG) After she dried, I put her out w/the others and monitored them carefully - I even stayed outside for roosting time. No one picked on her going up to roost. There are usually some scuffles for "prime" roost spots, but never resulting it injuries like this.
After she dried, I put her out w/the others and monitored them carefully - I even stayed outside for roosting time. No one picked on her going up to roost. There are usually some scuffles for "prime" roost spots, but never resulting it injuries like this.
The girls (mostly Henrietta I think), picked on little whitie while they were going up to roost- she was covered in blood - her entire head and neck. I brought her inside, wrapped her in a towel, and put her int he shower stall. I went back outside to finish setting up the heat lamp. When I came back in, I washed her off. It looked like she'd been pecked pretty badly around the comb. I dressed her wounds with neosporin, made up homemade electrolytes, and syringed them to her (she was in shock). She perked up after the electrolytes. I left her inside for the night. The next morning made her eat/drink some. She was acting much better overall, even making normal chicken noises. Later that afternoon, I gave her another bath, as she was still covered in blood, and I couldn't put her in w/the others so bloody. Here are her injuries after the 2nd bath.
Wednesday, October 23, 2013
Winterized the bees
Today (sadly) was my last hive check of the season. It was nice and warm with some sun, so I took the chance to get in the hive and winterize them. Today I.... 1) again took inventory of their resources (3 boxes of honey), 2) got a feel for how many bees (way more than I expected, bottom 2.5 boxes full), 3) treated for mites and 4) tilted the hive forward, so any condensation they produce will run forward (away from the winter cluster). I feel like they are looking really good heading into winter - they have everything they need to make it through. Though with bees, it's never a sure thing.
Thursday, October 10, 2013
Updates...
A few changes around here. I added 3 new birds to the flock (2 White Leghorns, and a Cuckoo Maran). Sadly, the Cuckoo Maran turned out to be a Roo, so he was destined for the soup pot. I had really wanted some of their dark "chocolate" colored eggs, but fate had other plans. The good news is, I found someone who wanted to breed Cuckoo Maran's, so he went to live on a farm in Olympia. So I'm down to 7 chickens (8 being the limit of what I am allowed). *Sigh* I guess I wasn't mean to have 8. Also someone posted an add recently for a breed I like/want, so am considering....
We also installed an automatic door on the chicken coop. It is the best $200 I've ever spent. It runs on batteries, and has a light sensor, so it opens/closes on its own at dawn and dusk.
I also tried my hand at making pickles. The fridge dill pickles turned out wonderfully. I also tried lactofermenting some, which didn't turn out so well - there wasn't enough liquid to cover the pickles, and they grew mold. I also tried hot canning some - I did 4 pint jars, one of which cracked while processing. The other three sealed right away (but I haven't tried them yet).
We also installed an automatic door on the chicken coop. It is the best $200 I've ever spent. It runs on batteries, and has a light sensor, so it opens/closes on its own at dawn and dusk.
I also tried my hand at making pickles. The fridge dill pickles turned out wonderfully. I also tried lactofermenting some, which didn't turn out so well - there wasn't enough liquid to cover the pickles, and they grew mold. I also tried hot canning some - I did 4 pint jars, one of which cracked while processing. The other three sealed right away (but I haven't tried them yet).
Tuesday, July 9, 2013
New coop pics
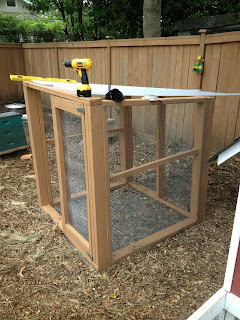
Finially, pics of the new coop. It's our first ever attempt to build something ourselves. We managed without killing each other. :)

 |
| Sides put together |
 |
| Sides attached to each other |
 |
| Door in, roof on, partially screened |


 |
| Nest box from old kitchen drawer |
Sunday, June 23, 2013
New coop
We are in the process of building a new, open air coop. We are using this design: http://myoutdoorplans.com/animals/simple-chicken-coop-plans/ but without anything on the inside (except a perch). They will just roost there at night, with access to their run during the day. I plan on building a freestanding nest box in their large run. I also purchase an electronic door opener, that will open and close with sunrise/sunset.
I will post pics soon of the progress!
I will post pics soon of the progress!
Monday, June 3, 2013
A tribute to Buffy & Zippy....
You have
nourished myself, my friends, and family well. Thank You. I hope you
have had the best possible chickeny life- able to run, dust bath, chase
bugs, and scratch around in the dirt, as chickens should.
I am honoring your life and death the best way I know how. I spent a few minutes holding each of you, thanking you for your life and nourishment before I did deed quickly, quietly, and humanely. I will continue to honor you by using all of your parts -you will continue to nourish us through rich, flavorful broth that we will enjoy in the months to come.
Sunday, April 14, 2013
Bees arrive today!
Today I'm picking up a package of bees. Im quite nervous, I did a few installs last year with my mentor, but it was over a year ago, and I had guidance. This is all on my own. Im nervous because it's also supposed to be kind of crappy out today and dont want to have to decide what is "too crappy" to install them into their new home.
The installation process is fairly easy. You take out the queen, set her aside, inspect her, hang her between frames in the new hive, and literally dump and pour the bees over her and into their new home. Then quickly close up the hive, and put some food on them to nourish them while the settle in, and are able to bring in food of their own. Im going to ask hubby to take a video of the install.
Ok, so here are pics hubby took during install.


The installation process is fairly easy. You take out the queen, set her aside, inspect her, hang her between frames in the new hive, and literally dump and pour the bees over her and into their new home. Then quickly close up the hive, and put some food on them to nourish them while the settle in, and are able to bring in food of their own. Im going to ask hubby to take a video of the install.
Ok, so here are pics hubby took during install.
The package

Prepping the hive for install

Dumping the bees into their new home

Shaking the last few from the box (video)
Sunday, April 7, 2013
Puttin' the girls to work....
I hate weeding. And have neglected the flower beds out front all winter
long. Weeding garden beds is one thing, but flower beds is another.
They don't feed me, and are just to look pretty, so I don't usually want
to weed them. So, we built a 'grazing pen' out of PVC so we can move
it across the flower beds, and the hens will eat the weeds for us. I
just have to put a couple of the hens in it, and take
them out when they're done. In the winter, it can also double as a
cloche over the vegetable beds if we put plastic over it.
The RIR's are hard at work!


Sunday, March 3, 2013
Shades of Green


Tuesday, February 19, 2013
Getting better at making rugs
I'm getting getter at making the rag rug with the toothbrush method. I'm figuring out what works and what doesn't work for me. Below is a picture of my 2nd attempt at rug making, measuring 35in x 22in.

And my 3rd attempt, my first try at doing a round one, pictured below. It is 28 inches across. I wanted to make this one bigger, but sadly ran out of yellow material. Note to self: don't by twin sheets, they are too small! Which is a shame, because I really love the buttery yellow color of this one.


And my 3rd attempt, my first try at doing a round one, pictured below. It is 28 inches across. I wanted to make this one bigger, but sadly ran out of yellow material. Note to self: don't by twin sheets, they are too small! Which is a shame, because I really love the buttery yellow color of this one.

Tuesday, February 5, 2013
Eggs again
Well, I'm finally getting eggs again. The hens stopped laying in November because of the low # of hours of daylight, and due to molting. The days are finally long enough (in combination with finishing their molt) which means I got my first egg of the year last week. Right now, just one of the Rhode Island Reds (RIR's) is laying. One of the Black Star's looks like she is about to start laying (her comb is brighter, more red than pink). I could make them lay better/longer throughout the winter by providing an hour or two of artificial light daily, but my coop doesn't have electricity. Some people do this, but I feel like if nature intended them to take a break for the winter, so be it.
Thursday, January 31, 2013
First rug
Today I finished my first "rag rug". It's made from upcycled bedsheets torn into strips, then knotted together. There are several different methods to make them, but I used the "toothbrush" method (just google it). Also, there is a crocheting method, which I'd like to try at some point. As with all craft projects, the first try comes out "eh". Here is the progression.


Baby Quilt
I recently finished a baby quilt for my brother and sister in law, so wanted to post pictures of it. I think it is my favorite one that I have done so far. I love the neutral colors, and I finally figured out why my sewing machine kept giving me trouble before.
It is made of cotton (the main print) and flannel squares. The edges are sewn, the snipped, then washed and dried many times to fray the edges, giving it the fuzziness. Each time it is washed, the edges will fray more, and the flannel will get even softer.


It is made of cotton (the main print) and flannel squares. The edges are sewn, the snipped, then washed and dried many times to fray the edges, giving it the fuzziness. Each time it is washed, the edges will fray more, and the flannel will get even softer.
This is the front, before the seams are snipped

The back, before the seams are snipped:

After the seams are snipped on the front, but before it is washed:

Finished front!


Subscribe to:
Posts (Atom)